TL;DR:
- A natural soap making checklist provides a structured guide to craft safe, fragrant, and nourishing bars at home. Proper equipment, precise ingredient measurements, and patience during curing ensure high-quality, safe soap batches. Adhering to safety protocols and proper storage results in long-lasting, well-crafted handmade soaps.
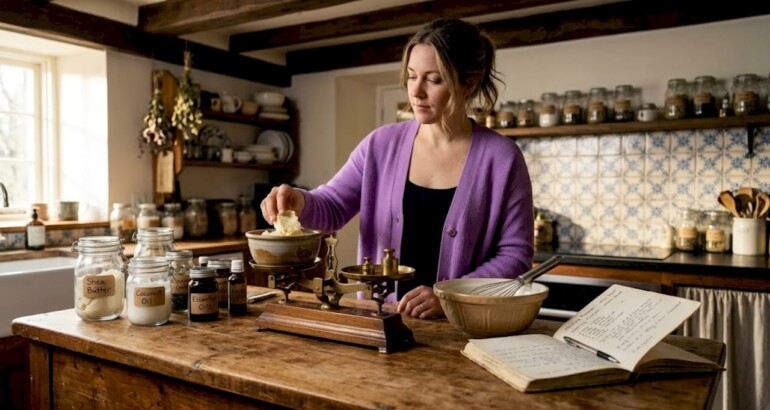
A natural soap making checklist is the essential roadmap every DIY crafter needs to produce safe, fragrant, and skin-nourishing bars at home. The process is formally called saponification, the chemical reaction where lye (sodium hydroxide) combines with oils and fats to produce soap and glycerin. Without a structured checklist covering tools like digital scales and stick blenders, ingredients like base oils and essential oils, and safety steps for lye handling, even experienced crafters risk failed batches or unsafe results. This guide walks you through every item on that checklist, from equipment to curing, so your first bar is one to be proud of.
1. What essential equipment must every natural soap maker include?
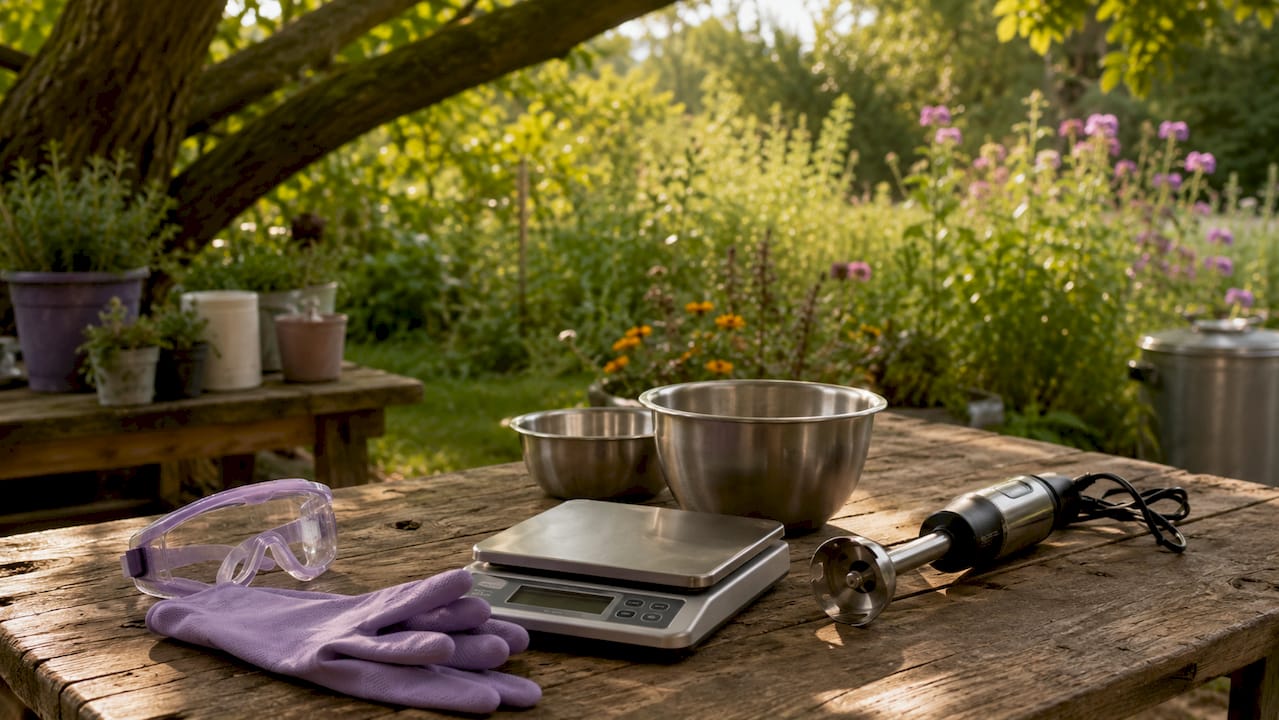
Your soap making supplies list starts with precision tools. Use a digital kitchen scale with at least 0.1g accuracy to weigh every ingredient. Even a small imbalance between lye and oils can produce a bar that irritates skin or fails to harden properly.
Here is the core equipment checklist ✅:
- Digital kitchen scale (0.1g accuracy minimum)
- Stainless steel or enamel pot for melting oils (avoid aluminium, which reacts with lye)
- Glass or HDPE plastic pitcher for mixing the lye solution
- Stick blender to bring the batter to trace
- Instant-read thermometer to monitor oil and lye temperatures
- Silicone spatulas for scraping and folding
- Soap moulds in silicone, wood, or rigid plastic
- Protective goggles, chemical-resistant gloves, and a dedicated apron for lye safety
Safety gear is non-negotiable when handling lye. Goggles protect your eyes from splashes, and chemical-resistant gloves prevent caustic burns. Work in a well-ventilated space or near an open window.
Pro Tip: “Burp” your stick blender by tapping it gently on the side of the pot before turning it on. This releases trapped air and prevents unsightly bubbles from forming inside your finished bars.
2. How to select natural ingredients for soap making
The quality of your soap depends entirely on the quality of your ingredients. Base oils form the bulk of any cold process soap recipe, and each one contributes different properties to the finished bar.
Common base oils and their benefits:
- Olive oil — gentle, moisturising, ideal for sensitive skin; produces a soft, creamy lather
- Coconut oil — creates a hard bar with rich, bubbly lather; use at 20–30% to avoid dryness
- Palm oil — adds hardness and a stable lather; consider sustainably sourced options
- Beef tallow — a traditional choice that produces exceptionally hard, long-lasting bars with a silky feel
For water, always use distilled water. Tap water contains minerals that can interfere with saponification and cause discolouration or rancidity over time. You can explore best soap ingredients for a deeper look at oils, butters, and botanicals suited to different skin types.
Additives like kaolin clay, activated charcoal, dried lavender, and natural colourants such as spirulina or turmeric can be stirred in at light trace. Keep additive quantities small, typically 1 teaspoon per 500g of oils, to avoid affecting the soap’s structure.
Pro Tip: Run every new recipe through a lye calculator like SoapCalc or Brambleberry’s online tool before you mix anything. This confirms your lye and water quantities are correct for the exact oils you are using.
3. What you need to know about essential oils for soap
Essential oil fragrance load in cold process soap sits safely between 3–6% of total base oil weight, roughly 0.5 to 1 oz per pound of oils. Exceeding this range risks skin irritation and can cause the batter to seize or accelerate trace unpredictably.
Not all essential oils behave the same in soap. Citrus oils like lemon and grapefruit fade almost completely during curing because their volatile compounds evaporate quickly. Floral oils like rose or jasmine are similarly fragile. The most reliable approach is to anchor your blend with base notes.
Adding base notes like patchouli, vetiver, or cedarwood helps lock in lighter top notes that would otherwise fade during the 4–6 week cure. Think of base notes as the foundation that holds the entire scent structure together.
“Natural does not always mean safe in high concentrations.” Cinnamon bark, clove, and oregano essential oils are potent skin sensitisers. These require usage rates well below the standard 3% threshold. Always check IFRA Category 9 guidelines before adding any essential oil to a leave-on or rinse-off product. A Japanese peppermint soap is a good reference point for how botanical fragrance can be used effectively without overwhelming the skin.
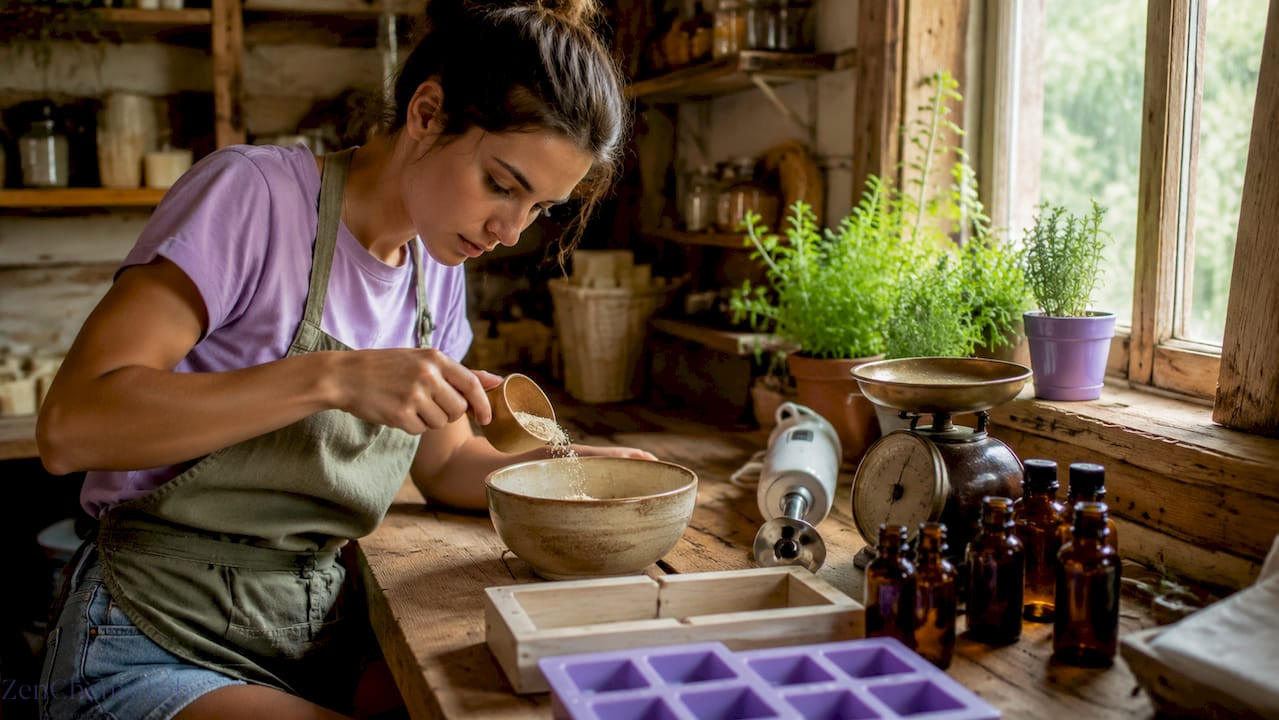
4. Step-by-step saponification process guide
The saponification process guide below covers the exact sequence for cold process soap making. Follow it in order every time.
- Prepare your workspace. Clear a dedicated surface, put on your goggles, gloves, and apron, and have all tools and pre-weighed ingredients ready before you begin.
- Mix the lye solution. Slowly pour lye into distilled water (never water into lye). Stir until fully dissolved. The solution will heat to around 200°F (93°C). Set it aside to cool.
- Melt your base oils. Gently heat solid oils like coconut oil and palm oil until fully melted, then add liquid oils. Allow the blend to cool.
- Match temperatures. Both lye solution and oils should reach 100°F–120°F (38–49°C) before combining. Keep them within 10 degrees of each other for smooth emulsification.
- Combine and blend to trace. Pour the lye solution slowly into the oils while using your stick blender in short pulses. Trace is reached when the batter thickens to a light pudding consistency and holds a drizzled line on the surface.
- Add essential oils and colourants. Stir these in at light trace, before the batter thickens further.
- Pour into moulds. Fill your mould evenly, tap it on the counter to release air pockets, and smooth the top with a spatula.
- Insulate and rest. Cover the mould with a piece of cardboard and wrap it in a towel or blanket for 24–48 hours. This keeps the soap warm and supports the saponification reaction.
- Unmould and cut. After 48 hours, check firmness. If the bar holds its shape, unmould and slice into bars.
- Cure. Place bars on a rack in a dry, ventilated space. Cold process soap requires a full 4–6 weeks of curing to reach stability, mildness, and long-lasting quality.
5. How to troubleshoot common soap making problems
Even careful crafters run into issues. Knowing what went wrong and why is the fastest way to fix it.
Separation or oily pools on top usually means the oils and lye were not fully emulsified before pouring. This happens when you stop blending too early. Stick blend the batter back together if it is still liquid, or rebatch the soap by melting it down and re-mixing.
Soft or sticky bars after unmoulding indicate either too much water, too high a percentage of soft oils like olive oil, or insufficient curing time. Extend the cure by another two weeks and test again.
Air bubbles inside the bar are almost always caused by the stick blender. Tapping the blender before use releases trapped air. Blend in short bursts rather than continuous runs.
Pro Tip: Never rush the trace phase. Most beginners rush trace, which leads to separation and uneven curing. Patience at this stage is the single biggest factor in producing a smooth, homogeneous bar.
For safety testing after curing, use pH strips or a pH meter rather than the traditional zap test. A safe, fully cured soap reads between pH 8 and pH 10. Anything above pH 11 needs more curing time or should be discarded.
“Understanding that soap making is a chemical transformation reassures crafters about working safely with lye. The lye is fully consumed in the reaction. The finished bar contains no free lye at all.”
6. How to store and label your finished natural soaps
Proper storage protects the quality of your cured bars and extends their shelf life significantly.
✅ Storage checklist:
- Store bars on a slatted wooden or wire rack to allow air circulation on all sides
- Keep them in a cool, dry space away from direct sunlight and humidity
- Avoid bathrooms for long-term storage; moisture accelerates rancidity
- Use a small humidity monitor if you live in a humid climate
- Wrap bars loosely in wax paper or kraft paper rather than sealing them in plastic
Labelling is especially important if you plan to gift or sell your soaps. Each label should include the full ingredient list (INCI names if selling), the date made, the curing completion date, and any allergen warnings for ingredients like nut-based oils or specific essential oils.
For gifting, a simple kraft paper wrap tied with twine looks beautiful and lets the bar breathe. If you are selling, check your provincial regulations for cosmetic labelling requirements in Canada, as handmade soap sold commercially must meet Health Canada guidelines.
Key takeaways
A successful cold process soap batch depends on precise measurements, matched temperatures, patient blending to trace, and a full 4–6 week cure in a ventilated space.
| Point | Details |
|---|---|
| Precision weighing | Use a digital scale with 0.1g accuracy to prevent chemical imbalances in every batch. |
| Temperature matching | Keep oils and lye solution within 10 degrees of each other before combining for smooth emulsification. |
| Essential oil limits | Stay within 3–6% of base oil weight and anchor blends with base notes like patchouli or vetiver. |
| Curing time | Allow 4–6 weeks in a dry, ventilated space before using or selling any cold process bar. |
| Safety first | Wear goggles, chemical-resistant gloves, and an apron every time you handle lye. |
Why patience is the real secret ingredient
I have made a lot of soap over the years, and the single lesson that took me longest to truly absorb is this: the process does not reward shortcuts. Every time I tried to speed something up, whether it was skipping the temperature check, blending past trace too aggressively, or cutting the cure short by a week, the bar told on me. Soft centres, crumbly edges, a scent that disappeared within days.
The chemistry of saponification is not complicated, but it is unforgiving of impatience. I now keep a dedicated soap journal for every batch. I record the recipe, the temperatures, the trace time, the pour date, and my observations at unmoulding and at the end of cure. That journal has saved me from repeating the same mistakes twice and helped me refine recipes I genuinely love.
My honest advice: start with a simple three-oil recipe using olive oil, coconut oil, and castor oil. Get comfortable with the process before you experiment with exotic butters or complex fragrance blends. Safety is not a step you do once at the beginning. It is a habit you build into every single batch. Gloves on before the lye comes out. Every time, without exception.
The crafters who produce the most beautiful, consistent soaps are not the ones with the most expensive equipment. They are the ones who respect the process, take careful notes, and let the soap cure as long as it needs to.
— Alex
Explore more natural skincare with Zenchemylab
If this checklist has sparked your passion for handmade soap, Zenchemylab has more resources to take your craft further.

Zenchemylab’s natural beauty tips for 2026 connect the science of skin health with sustainable, plant-based ingredients, giving you the knowledge to make smarter choices in every batch you craft. You can also browse the full handmade soap guide for a detailed walkthrough of techniques, or explore the natural skin product collection to see how artisanal ingredients translate into finished skincare. Whether you are refining your first recipe or building a full self-care routine, Zenchemylab is here to guide every step.
FAQ
What is the saponification process in simple terms?
Saponification is the chemical reaction between lye (sodium hydroxide) and oils or fats that produces soap and glycerin. Once the reaction is complete, no lye remains in the finished bar.
How long does cold process soap need to cure?
Cold process soap cures for 4–6 weeks in a dry, well-ventilated space. This allows excess water to evaporate and the bar to reach its full mildness and hardness.
What is the safest way to test if soap is ready to use?
Use pH strips or a pH meter after curing. A reading between pH 8 and pH 10 confirms the soap is safe. Avoid the traditional zap test, as pH strips provide a safer and more objective result.
How much essential oil should I add to homemade soap?
Keep your essential oil usage between 3–6% of total base oil weight. That equals roughly 0.5 to 1 oz per pound of oils, within IFRA Category 9 safety limits.
Can I make natural soap without lye?
No true soap can be made without lye. Every soap, including commercial bars, is made through saponification. The lye is fully consumed in the reaction and does not appear in the finished product.